Friday, 11 May 2018

Pinterest Inspiration

Today I was avoiding doing housework and browsing through pinterest when I came accross a card  on  dahlhouse.designs.com that used striped and polka dotted patterned paper.

My mind went immediately to the new unopended packet of 2018-2020 dsp that arrived in my pre-order last week.  So I decided to CASE the card using SU products.  It's great that anytime I find a card for inspiration SU has just the right, but different, stamp sets to CASE with. 

The Hedgehugs stamp set is just so darned cute.


PRODUCTS:

2018-2020 DSP
Hedgehugs Stamp Set
Natures Twine
White Embossing Powder
Basic Grey CS
Early Espresso Ink Pad
Real Red Marker
Petal Passion Menories and More Heart Stickers
Crumbcake Blends
Layering Circles Dies
Big Shot
Piercing tool and Pad.
Dimensionals

My photography skills are a bit lacking so it is hard to see the detail here, but I have used the piercing tool and pad to create faux stitching around the borders of the top layer, including around the circle cutout.  The die leaves a slight guide line which helps to keep the border even.

This card came together pretty easily. Here are a few clues to how it went together.

Matt the dotty DSP onto thisk whisper white, it is not sturdy enough to support the heavier Natures Twine, and the fine angles of the circle cutout need extra support too.

Stamp the Hedgehog with Early Espresso onto thick whisper white CS and colour with Blends.  Fussy cut him out but don't worry about doing the flower.
Stamp the Hedghog again in Early Espresso onto the card front then layer the fussycut Hedgehog over top.  Colour in the flower and you are good to go.
Stamp the inside sentiment in the same colour as you make the flower.

Thank You for visiting my Blog.  I hope you found something to inspire you.  Go forth and Create!!!!!!


Thursday, 3 May 2018

Blog Hop with Nadine Weiner


Well, it's that time again, when we Crazy Crafters get to CASE another amazing artist and share our creations.  Today we are CASE-ING the amazing Nadine Weiner.

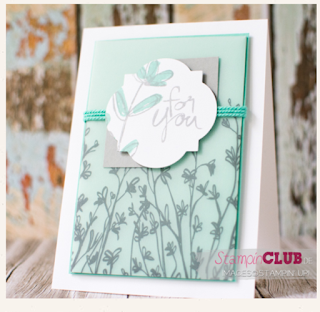
Her blog is full of inspirational cards and I was spoilt for choice.  In the end I chose one from a while back. I loved the classic simplicity of this card. It is really feminine but in Blues and it really appealed to me.  I think this card is pretty perfect as it is so all I did was to use some new product to change it up a bit.  Thankyou Nadine for hopping with us today.

This is Nadines card

This is my CASE


Making this card gave me the chance to use some of the products from the new catalogue. I was lucky enough to have attended OnStage in Sydney and was able to purchase these early release products.

DSP is the lovely Share What You Love
Mint Macaron Cardstock
Vellum Cardstock
Pearlized Doilies
Natures Twine
Layering Alphabet Edgelits Dies
Faceted Dots
Wink of Stella


Click on the links below to skip to the next Crazy Crafter,  it will be well worth the visit!


I challenged myself....

I came to cardmaking through scrapbooking as many of us do.  While unpacking some old boxes I found this photo of my son and his dog when they were both just pups.  James is now 17 and Bonnie is 13.  This is one of my favourite photos of them together, and inspired me to have a go at scrapbooking a page with my Stampin Up Products.  I had been used to scrapping with a plethora of different brands and products and wondered if I would struggle or feel limited in just using SU.  Well, was I pleasantly surprised.  I decided that in the spirit of using and older photo I would also use retiring product as well, so doubly challenged myself.  It was amazing how easy this was using some DSP and some Memories and More cards. I found myself wanting to stick more and more onto the page and had to stop myself, I even removed some stuff as the page was getting pretty busy.

I see more scrapbooking in my future.  I might even take a current photo of the 2 of them and do a "then and now" layout.


Stickers and sentiments are from the Petal Passion Memories and More Pack.  The DSP is Fresh Florals and Petal Pallette and the CS is Lemon Lime Twist. I coloured the flower stickers with Light Old Olive Blends and tied some bakers twine in a bow.  So Quick.

I did cheat a little with the tag and stamped the names with the new Make a Difference alphabet set.  WOW  is that set going to get some use!!!

Lemon Lime Twist is is my favourite colour and I'm planning on using it often while it is an In Color.  It goes so perfectly with Black and White.

Saturday, 21 April 2018

CC Blog Hop casing Martha Groeger


Im excited to be casing the Amazing Martha Groeger for todays Crazy Crafters Blog Hop.  Martha is an amazingly talented Stampin' Up artist and it would be well worth heading over to her blog for a look see.  She has some amazing projects there which made it hard to choose which card to CASE.

I eventually settled on this one.  It is a really simple card but something about the layout just appeals to me.


I decided to CASE the basic layout of this card using the new products from the Product Purchase Premiere and the Share What you Love Suite.  This set is so easy to use!  It's amazing how fast a card comes together when everything just works together.  I think this Suite is going to be one of my favourites.


Here is my Card.


DIRECTIONS:


  • Sponge the lattice piece from the Delightfully Detailed Laser Cut Specialty Paper with Mint Macaron.
  • Sponge around the outside of White Shimmer paper with Mint Macaron and Pear Pizzaz and attach the lattice piece.
  • Fussy cut a couple of flowers from the Share What you Love DSP and use the Starburst punch on a piece of the Pink stripe DSP.
  • Use the 1 3/4" punch to create a circle for the sentiment out of Shimmer Paper.  Ink the edges with Mint Macaron.
  • Stamp the sentiment and flourish from the  Detailed with Love Stampset.
  • Add a length of the beautiful Rich Razzelberry Velvet ribbon to the lattice using glue dots.
  • Layer your cutouts as above with dimensionals and attach lattice section to a card base of Pear Pizzazz.


  • Hand draw in some stitched lines and add a couple of the Share What You Love Artisan Pearls as a final touch and you are done.
Its a shame my camera does not do justice to this beautiful DSP.  The Blue flowers are pearlized and have the most amazing sheen in real life.

So quick and simple, it really is a joy to craft with the products from a Suite!


While you have your inks and stamps already out you might as well create a matching insert and envelope to complete the set.

Please click on the links below to visit the Blogs the other Crazy Crafters taking part in this Hop.  You will be amazed by the amazing projects they create!!!

Thankyou for visiting.


Friday, 20 April 2018

Mind Officially Blown - AKA the card that had to be made!

I'm Back!

I recently took 6 months off crafting, well, off life as we knew it actually.  I had the privelege of nursing my father who died of Lymphoma earlier this year.  It was a difficult time, but one I will be forever glad that I could be a part of. It is now time to move forward with my life, poorer as it will be without him in it. 


During those dark times there was always a glimmer of something fantastic to look forward to, and that was On Stage 2018 at Luna Park.  This was my first On Stage and WOW, what a way to come back with a bang!


All I can says is that if you are ever considering attending  DO IT!!!!!

It was the best weekend ever, and a big thankyou to my roomies Sandra Mastello and Jessie Holton.  Please have a look at their blogs, they are both amazingly talented ladies who will inspire you to create.

Onstage attendees are lucky enough to be able to order new product early with a Product Purchase Premiere, and I was so excited that the Delightfully Detailed Laser Cut Specialty Paper was included in this pre-order.  We got to play with this paper during a make-and-take at OnStage and as soon as I saw it I knew exactly what I wanted to do with it - I just had to colour it with blends!


This is the result:


This paper allows for smooth seamless blending. I used 2 of the new In Colour Blends in Lovely Lipstick and Pineapple Punch (free gifts of new products is also a perk of attending OnStage)  I complemented them with Light Calypso Coral and Old Olive in light and dark.
The Stamp is from the Detailed with Love Stamp set and also stamped in Lovely Lipstick and cut out with the layering ovals framelits which of course are perfectly sized for the job.


In the closeup here you can see the beautiful faceted dots that also come in the Delightfully 
Detailed Suite, and just to add to the bling I Wink of Stella'd everything to match the lovely shine from the dots.


In this photo you can see the tag from the Share What You Love Embellishment Kit.  They perfectly complement the card when simply coloured with Blends which makes them super versatile for any colour scheme.  

The best part is this Embellishment Kit comes free with the GOTTA HAVE IT ALL BUNDLE.

A simple colour wash background,  a flick with a Stampin Write marker, and a couple of dimensionals.  Matt the watercolour paper onto some Old Olive CS and then on to a thick Whisper White card base and you're done!


Another highlight of my OnStage experience was getting to meet this lovely lady!
Sara attended our Crazy Crafters Team meeting on Sunday Morning.  It was a wonderful experience, she is as lovely in real life as she is on line. It was great to hear her talk about the Company and share so much of her life with us.


Thankyou for having a peek through my Blog. 


Saturday, 9 September 2017

Crazy Crafters Blog Hop with Stesha Bloodhart


Today we get to share our cards CASE'd from the amazingly talented Stesha Bloodhart.  Please click on the links below to jump through and have a look at all the talented Crazy Crafters I'm hopping with today.  When I saw the card of Steshas card that I chose to CASE I knew immediately it was "the one". I have a good friend that I worked with for over 25 years as a Paramedic, he retired from the job a couple of years ago, but friencships forged under those circumstances are for a lifetime.  He is as much my husbands friend now as he is mine, and I may one day even forgive him for reitroducing my husband to Motorbikes (don't get me started on that one!) I thought this was the perfect card to send to a male friend to let him know I value our friencship, as I know he struggles from time to time with PTSD.  So thankyou Stesha for inspiring me to make and send this card to a dear friend.

This is Steshas amazing card.


I love the elegance of the Gold Acetate with the Black Cardstock and the Black & Gold accents.

This is My Card.


I have used a Sticker from the Eastern Gold Vinyl pack to outline the sentiment circle and used the Stitched Shapes framelit circle to give it a little texture around the edge, it fits perfectly with the image! The sentiment is from the Beautiful Bouquet Stamp Set.  


Stampin Up have such a wonderful array of Gold accents at the moment.  It makes it very easy to add some Bling!

Please click on the list below to progress through the Hop.  I'm sure you will find mountains of inspiration from the talented Crazy Crafters.

Here is a list of the products used in making this Card:

Basic Black Cardstock
Whisper White Cardstock
Gold Foil Sheets
Fabulous Foil Desogner Acetate
Eastern Gold Vinyl Stickers
Layering Circles Thinlits
Stitched Shapes Circle Thinlits
Gold Embossing Powder
Metallic Sequins
Mini Tassels
Gold Mini Sequin Trim
Beautiful Bouquet Stamp Set


Friday, 8 September 2017

In need of a Sympathy Card.

Yesterday I found myself in need of a Sympathy card to give to my Cousins family. She died suddenly from complications of the Flu at only 47 years old.  My stash of cards did not contain a single Sympathy card.  I guess making cards makes me happy, so I haven't previously felt the need to make a sad card for the sake of crafting.  Yesterday however, I felt the need to personally make a card for my Uncle to pass on my condolences for the loss of his daughter.  Although I haven't seen my cousin since we were little kids due to her parents marriage breakup, her dad (my dads brother) has continued to be a part of our lives and is being a great support to my Dad who is battling cancer.  My Uncle, and every other non-crafter out there, probably has no idea about how much time, effort and thought goes into the crafting of a card, but I felt better giving a card that had "me" in it rather than one purchased from a shop.  I can now find motivation and satisfaction in creating Sympathy cards.


I did have to search the Holy Grail of Ideas AKA Pinterest as I had no idea where to start with a
Sympathy Card.  I found a beautiful card that I really liked which was made by Kay Miller of My Joyful Moments. If you get a chance check out her blog.  She is not a SU demonstrator but I have used her card for inspiration and adapted it to use SU product.  Thankyou Kay for sharing your work.


I also put together a "Hello" card at the same time.  I used a mishmash of stamp and dies sets for these cards.  I loved the simplicity of the original card and tried to maintain this on my version.  I really like the mix of grey and white with just a pop of colour.  

Thankyou for viewing my card.  I have listed all the products below that I used to create these cards.

Happy Crafting!!

PRODUCTS

Whisper White Thick Cardstock
Smoky Slate Cardstock
Simply Scored
Striched Shapes Framelits
Bouquet Bunch Framelits
Lots of Love Stamp Set
Beautiful Bouquet Stamp Set
Better together Stamp Set
Timeless Textiures Stamp Set
Flirty Flamingo Ink Pad
Smoky Slate Inkpad
Glitter Enamel Dots


Pinterest Inspiration

Today I was avoiding doing housework and browsing through pinterest when I came accross a card  on  dahlhouse.designs.com that used striped ...